**Update 2015, I built another one of these gates for the bottom of our stairs. Video below.**
Now that our daughter is sleeping in a bed that she can climb out of at any time, it was high time to put a baby gate at the top of the stairs. Bought a cheap temporary gate that you had to put up and take down each time you went up the stairs, pain in the neck, and it was not good for the half-walls that are at the top of the stairs. So we decided that I should try and put my new woodworking hobby to use and build a gate that was far better then anything you can buy.
Came across an actuating gate that Matthias Wandel had come up with, (HERE), and really liked the idea even though we didn’t need the complete parallelogram effect. I did like the idea of actuating so that the gate rested on top of the latch instead of hanging all the time and latching with a pin. The thinking behind this is if any of the kids stand on the gate it will spread the weight between the latch and the hinge instead of just the hinge. Only problem with Matthias’s design (for our situation, there is nothing wrong with the design) is that if you are not closed on the latch, holding the gate or have it stored against the wall the gate will fall to the ground, we wanted to have something that will hold it up and allow it to swing freely.
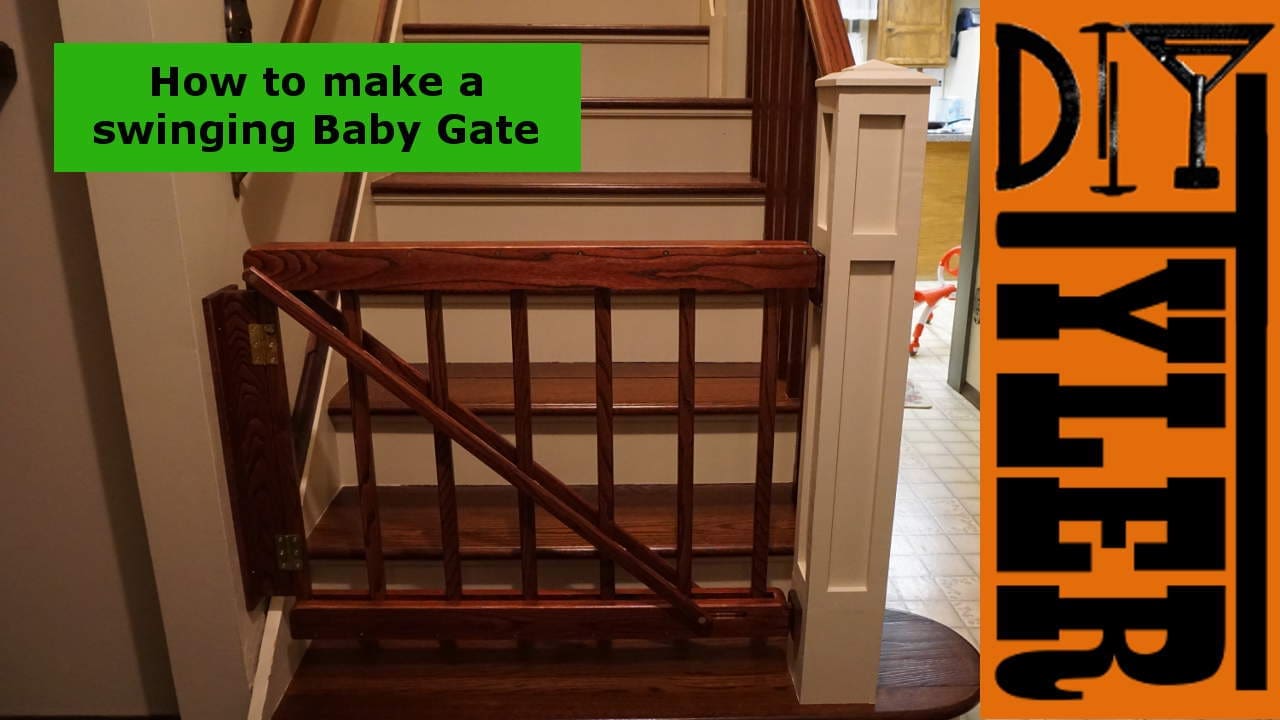
Sat down to design the gate and came up with the below design, based on Matthias’s gate. The addition of the diagonal rail allows the gate to swing upwards to unlatch but hold itself up when let go. All the vertical slats are pinched between the top and bottom rails and are only held in place using a dowel pin that does not penetrate through the rails. The angle rail is held in place with a 1/2″ oak dowel that does go all the way though the assembly.

Built the basic frame out of pine (Below) to make sure that the concept would work in the real world, worked like a charm and this made me really excited to start the project.

|

|
Decided right away that this was going to be my first venture into hardwoods. At first I was going to make it out of Red Oak or Hard Maple, but while talking to the lumber mill they suggested that I try ash, similar grain pattern as Oak and certainly hard enough for indoor furniture. Ash it was!
First step of operations was to print out the 1:1 drawings for the hole patterns (below). I used Matthias’s big print program (HERE) to accomplish the task. I debated back and forth with myself as to if I really needed this program or if I just wanted it because it was cool! Am very glad that I made the purchase, made everything easier and really think that it made the end result better looking, squarer, smooth actuating, etc.. Highly recommend it.

Kept careful track of all the parts as I cut them using the cut list.

Cut the slats to length using the miter saw. (As of writing this article I have made a table saw sled, would probably recommend using the sled as you should get a cleaner cut. The blade on the miter saw is brand new so it cut wonderful for me.)

Again, keeping track of all the parts.

Used the big print program to print out the slat design so I could easily mark the center and the radius for all the slats. Numbered the slats so from now on they stay in the same order.

|

|
Used the drill press to make holes for the dowels.

Used to band saw to cut the radii.

|

|
Clamped the belt sander onto the workbench to sand down the radii of the slats. (Have since made a jig to hold the belt sander.)

Set up the router table to round over the slats, all but the slat that will be mounted to the hinge board, #7. Was amazed how well the hardwood rounded over, is beautiful.

|

|

|
Cut the latch and hinge mount boards to size and rounded over those edges as well. These boards are pine, used pine because I thought I would try and save a few dollars and get the pine from the “blue store”…..fail…..would have been cheaper to get the ash from the lumber mill!

Used some big print printouts to mark out the latches. Cut with the band saw and than rounded over the edges.

|

|
Used the big print printouts to mark the holes for the dowels, the rounded corners and the sliding grove. Used a punch and marker for this.

Bunch of drilling photos below.
Used the band saw to cut the dowels down to length and the belt sander to round the edges over.

|

|
Quick dry fit…..so far so good!

Originally tried to cut the guide slat using the jig saw…..fail…..not enough board to keep the saw square, used the router instead and it worked perfect. Both images below are before I cleaned up the slat with the router.

|

|
Used the band saw to cut the corners of the top and bottom rails, belt sander to round over smoothly than rounded over the top edges with the router.

|

|
Cut the angle rails down to size with the miter saw, cut the corners with the band saw (after marking with a big print printout) and rounded everything over with the router.

Another dry fit…..seems to actuate as expected!

Cut and rounded over the dividers. (I think that the band saw needs a new blade. Actually need a “real” band saw but other tools first.)

Main gate assembled for testing. Assembled using 1 1/4″ wood screws. Brass colored, real brass screws didn’t stand a chance with the hardwood.
(Picture really makes the wood look warped but it isn’t!)

Assembling the latch and hinge mounts by attaching from the back where the screws will be hidden.

Hung the gate to make sure everything was kosher. I had designed in the ability to take some of the width out if needed, thankfully no changes were required. Fit perfectly and worked even better.
And the finishing process. Sanded down to 220 grit, stain, danish oil and than polyurethane.
Was torn as to how I should finish this gate….Am (was) a pretty big fan of the tung oil/varnish mixes but they are fairly expensive and I was pretty offended when I realized that I was pretty much buying a can of minerals spirits!
Heard lots of great things about Watco Danish oil (new favorite) so I thought we should give that a try. Note: Danish oil is an oil/varnish mixture also it is just much cheaper then the “Tung Oil” that I was buying.
Wanted to add additional protection on the top of the oil and for some reason I wanted to try Rust-oleum ultimate polyurethane, a water based poly. Read and read to see if it would be okay to put a water based product over a oil based and there was lots of info swinging both ways! Ended up going with the oil based rub on poly (That I mixed myself) purely because I didn’t really like how the water based poly ended up looking. Used a rub on blend of poly simply because I thought it would be easier to apply, which it was, and because, from what I read, rub on dries smoother than if you brush on.
Next up to try will be a lacquer of some kind!
The water based ultimate polyurethane is now my favorite “quick, not really important” polyurethane, dries really fast, doesn’t smell at all and seems to be great for protection.
Assembled the finished gate putting some past wax in the wear joints to prevent squeaking.

Held the angle rail in place with a few short wood screws. Couldn’t for the life of me find brass colored 3/4″ screws but nobody will ever know if I don’t tell.

Finished product!
In the end we definitely ended up with a better gate then we would ever be able to buy!
Total cost for the wood was about $60, screws and hinges $10.
Please follow and like us:
4 thoughts on “Parallelogram Baby Gate…..Actuating gate”
Wohh precisely what I was searching for, thanks for putting up.
when making rails, rounding just one side of it (left or right side from dowel hole, both top and bottom) also can prevent gate from going down without making additional attachment.
I抎 must check with you here. Which isn’t one thing I often do! I take pleasure in studying a post that will make folks think. Additionally, thanks for allowing me to remark!
Hello Tyler love projects but one would like to get more info on is the murphy bed…. Possible to get more about the project??