My wife asked me to make some simple picture frames for her new dutiful children picture series that she is drawing, of course I happily obliged but I wanted to make a miter sled so that I would have perfect corners.
One might ask why not use your miter saw, that is what its for. True but even with a miter saw when you pull down the saw it can scew it to one side or the other if you don’t pull it perfectly straight down. A standard non-sliding saw with help this issue but it can still be pulled to the sides a little bit…solution, make a sled!
For my sled I am taking inspiration from Jay Bates and Steve Ramsey using a few ideas from each of their sleds to make something that works for me. Basically I wanted something that was a perfect
90° and had a good fence that I could use my hand as a clamp yet still slide the sled easily.
Check out the build video below and let us know what you think about the sled, if you like what you see please like and subscribe we would love to have you back.
Started out with a piece of birch plywood (this in the only thing purchased for this project, $7.98) and struck a like 6″ in from each side and cut off the remaining triangle with the jig saw. Jay Bates used this cut off piece as the fence for his perfect miter angle but I wanted to have a little more substance to grip when pushing the sled and holding the work piece.

Then got to work on making a few runners for the table saw miter slots. Previously I had filed down the T slot that was on both ends of the slot as I have never liked it and it often made things more difficult having them there.
Made the runners by adjusting the fence a few times, trial and error. Then ran the sander over the runners a few times to smooth things out and get a better fit. After I had the right width a set of calipers made easy work to measure the depth of the miter slots and set the fence accordingly to cut to the proper depth.
Made the runners by adjusting the fence a few times, trial and error. Then ran the sander over the runners a few times to smooth things out and get a better fit. After I had the right width a set of calipers made easy work to measure the depth of the miter slots and set the fence accordingly to cut to the proper depth.

|

|
Set the runners into the miter slot, used a few dabs of glue to hold in place. (Didn’t want to glue along the whole runner as I hope new have a new table saw in the near future and would like to reuse this sled if I can. In this case I should be able to pop the few dabs of glue and replace the runners.) Set a few cans of paint on top to apply some pressure.

|

|
After letting the glue set for a few minutes I put the sled on my assembly table and put 4, 5/8″ wood screws into each runner, drilling, countersinking and putting the screw in flush.

Brought the sled back over to the table saw and set the blade depth to cut the extra runners off, will keep these for future table saw sleds. I then ran the blade through making a slot that it will slide in each time a miter is cut.

|

|
Marked 6″ in to set where the miter fence would be put in place. Cut the fence out of a piece of scrap 2×6 on the table saw and put a 45° on each side so that the two fence pieces would be touching in the miter location and would not overhang at the back of the sled.
Set the fence in place using the marks to make even on both sides and then put a square in each side.
When I finally had the fence perfectly square I screwed the back of the fence to the base board from the bottom with 2″ screws. When the back was screwed in place I ran the blade through the fence as it would when I cut a miter…..and after making sure it was still square I screwed in place from the bottom as well. Added one more screw in the middle of each side of the fence.
Thought it would look a bit nicer if I covered up the kerf line from when I cut the slot in the miter fence so I cut a small piece from the baseboard cutoff and screwed it into place making sure that there were no screws in the path of the blade.

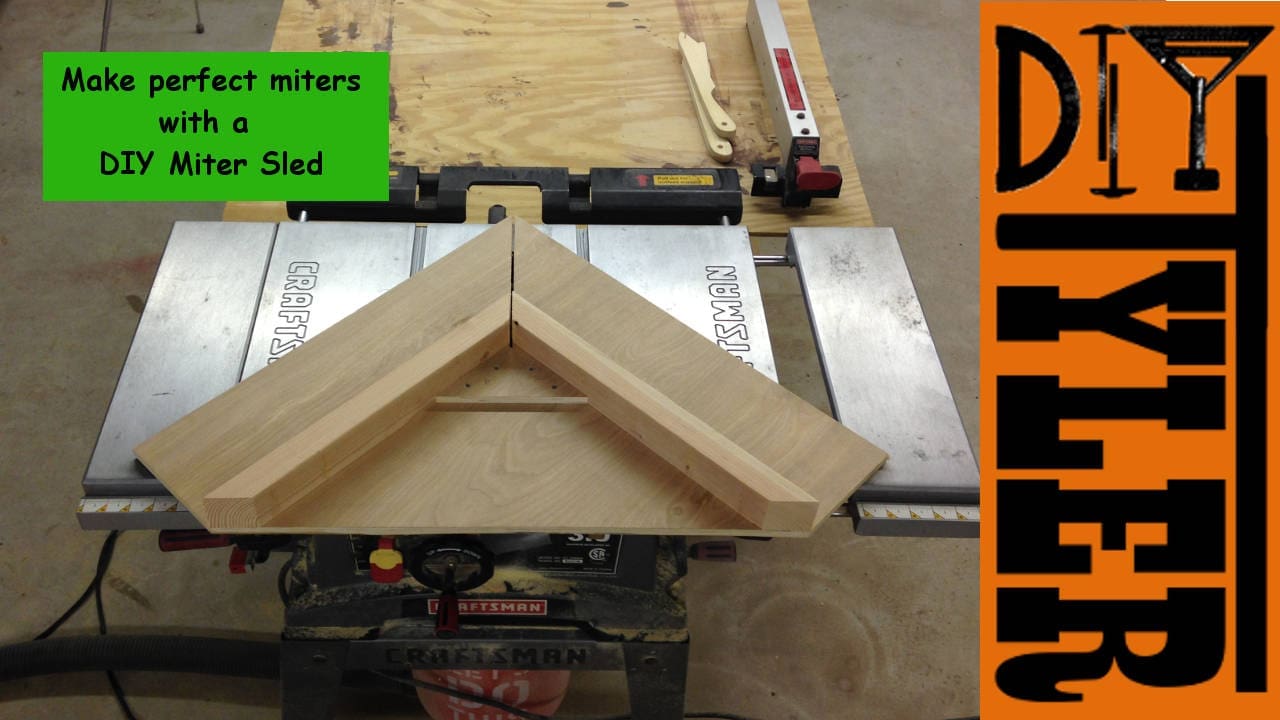
Cut a few test pieces and they look pretty good! Frame build to follow next week ;)! A little Johnsons past wax to make everything slide nice, also re-applied to the table saw, and it moves amazing!
Thanks for reading, we will see you next time!
Please follow and like us: