Been a while since I have posted anything on this webpage and I am sorry about that! There is a list of excuses I could rattle off but nobody wants to hear that!
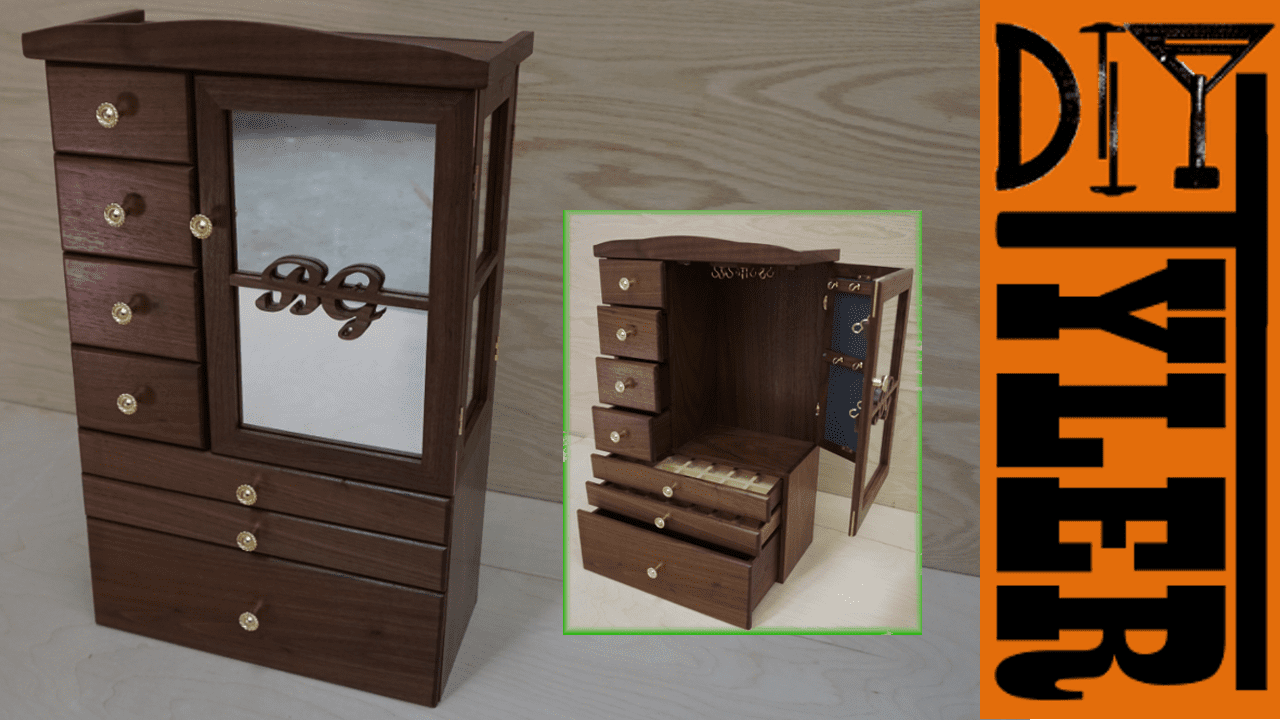
I made this walnut jewelry box (Video below) as a Christmas gift for my wife and several people asked me if there were going to be any plans made available. I always make sketchup drawing for my self before starting most builds and this was no exception, so sure, I will share that!
Downloadable file for the jewelry box is at the bottom of this post. Good luck and if you have any question let me know!
Prep Stock
This jewelry box is made almost completely from walnut which I got from my Uncle in southern Missouri and I wanted to be very selective of the grain so I could display the best selections on the outside of the box.
I selected the best grain and marked it out using some white chalk.


Then cut to rough length using the chop saw, marked out appropriately and re-sawed using the bandsaw.
|
|
|


I then jointed one face and one side of all the stock.

Thickness and Cut to Final Dimensions
And brought each piece to its appropriate thickness based off the plans.

Once I had all the pieces prepped it was a matter of cutting them to their final width and length and I did all these cuts on the table saw as this tool seems to cut better, at least for me, thus preventing tearout.
|
|
|


Dadoes
There are shallow dadoes in several of the sidewall sections to either accept a horizontal frame section or a shelf. I made these cuts using the table saw with a dado stack. I made sure to flip the board half way through the sequence of cuts to prevent the board from pinching between the blade and the fence. You will notice that the plans make measurements from either side of these boards so you are, in a way, force to flip the board.

Scrape and Sand
Card scrapers are amazing, if you don’t have some, get some….they save a TON of sanding time. Needless to say I scraped all the boards and sanded using 220 grit on the ROS.

Glue Up
Using a small spout on my glue bot I spread a small amount of glue, spread with an acid brush and clamped together the frame together making sure to use some scrap wood at the clamp heads to prevent any marking.

Glued some small rails of wood into place to act as drawer slides.

And lastly glued the previously glued up back panel into place.

Drawers
The sides and back of all the drawers are assembled using 1/4″ box joints.

|
|
|


And glued up carefully using glue and clamps.


The drawer fronts have a small dado along the sides to glue the frame in and along the top to allow the drawer to shut all the way. I cut these on the table saw.

And routed a small roundover on all 4 sides of the drawer fronts to soften the edge and add some shadow around each drawer.

Glued the drawer fronts into place using a combination of CA glue and wood glue.
|
|
|


Doors
Made the two doors using the miter sled of the table saw and the dado stack to make a rabbet for the glass. I glued up and “Clamped” using blue tape.

Added some maple splines for strength and they look great! I cut the splines using a simple jig that I threw together in a few minutes.

|
|
|
|


Hanging the Doors
Although I had mortised the hinges, I found, while test hanging the doors, that I actually had to angle the mortise back a bit to leave the hing open a bit and allow for the screw heads. Otherwise the doors would not close completely. The doors went on surprisingly well, only had to scrape the bottom of the side door a little to allow clearance.

Trim
I added a decorative trim along the top of the box to allow you to throw odds and ends on the top if you want to. This trim is held on with wood glue.

Finish
I used general finishes arm-r-seal (Satin sheen) for my finish on this project. I tried several homespun finishes but non of them looked quite as good as the arm-r-seal.

Hangers
Added a chandler and some bracelet hangers to maximize space.
|
|
|


Complete


In conclusion, the wife loves it, it was a great time building this and I really don’t think there is anything that I would change if i was to build another one!
Plans
If you would like to build this jewelry box or modify to your liking you can download the plans below. Please share pictures if you build it!
![]()
| jewelry_box_plans.pdf | |
| File Size: | 1005 kb |
| File Type: | |
Please follow and like us:
12 thoughts on “Walnut Jewelry Box”
Hi Tyler, would it be possible to get your sketchup file, so i can make the measurements into metric easier ?
I saw the image of the cut items but no list for the dimensions. Is this something I could get or did I over look something? Thanks for the awesome videos!
Tyler,
I’m anxious to get started to build this beautiful jewelry box. Is there a list (bill of material) that will tell me the name of each part that goes with the part number?
Ya I am looking for a cut list too. It would be helpful when figuring out what we need for boards.
Please share if anyone has this info. If not I will share when I figure it out
Thanks, Mark
Hi Tyler. Your jewelry box is really beautiful, you did a fantastic job on it. I was wondering if it would be possible to get the SketchUp file from you as opposed to the PDF drawing of the jewelry box.
Hey Tyler what was the thickness of the back of the Jewelry box please.I really enjoyed watch your vid mate my daughter is going to love it for her 21st birthday thank you again for the pdf.
I don’t remember exactly but very thin 1/4″ sounds about right.
Do u still have the plans for this? It looks like a super fun project for me and my daughter.
Hi, I know this is an old article but I was wondering if you still have the pdf plans for this project? I get an error 404 when I try to download them. I’d love to build this as a gift for my girlfriend
I have tried to download the PDF file and get an error message.
I was wondering if you could email me the PDF. I was also wondering if you have Sketchup plans for this project.
Thanks,
I’m having the same problem with getting the error when I try to download the PDF.
Could you email me the PDF and sketchup plans?
Thanks!
Hey Tyler,
I have tried to download the PDF file and get a 404 error message. I was wondering if you could email me the PDF and if you have Sketchup plans for this project, that’ll be great. I’m very interested and considering making this for my HSC major work project.
Thanks.